In the previous post, I showed an example of scraping dynamic websites with python’s requests-html package. While requests-html is a great light-weight tool to harvest real-time data, modern websites can easily recognize it as a bot script from the user-agent string (looks something like python-requests/2.28.2), and may refuse entry after a while.
The selenium package solves this problem by behaving more like a human in interacting with a website. Unlike requests-html that works in the background, selenium launches a browser that directly requests a page, much like you and I do. As a result, its user-agent string is the same as that of a regular browser, like Mozilla/5.0 (X11; Linux x86_64), and the server tends to be less hostile to such traffic patterns. The disadvantage is that selenium is slower and uses more resource than requests-html, but the pros generally outweigh the cons.
Scraping with XPath: a primer
Earlier I described how requests-html utilizes the “class” and “id” attributes to select an html element. selenium can do the same, but here I’ll use a different selector called XPath (short for XML Path). XPath is a query technology that uses


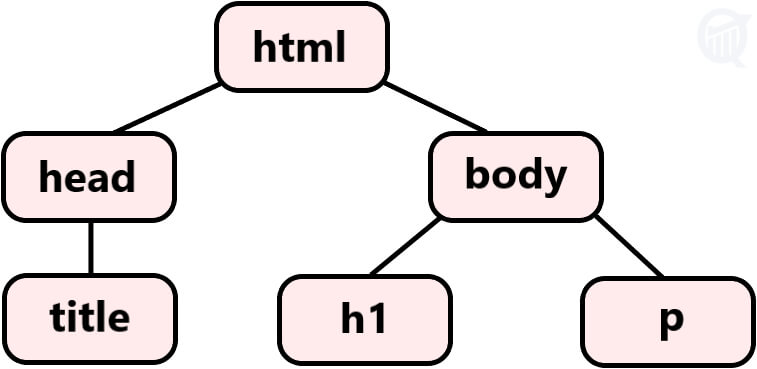
path expressions to select nodes in an XML or HTML document. It works by tracing the path along the DOM tree (Document-Object-Model tree), much like a traditional filesystem. DOM tree is how a webpage is represented internally to most HTML parsers, shown in the simple example above.
XPath can be absolute, containing the complete path from the root node to the desired child node, or relative, where the path starts from the node of your choice. Relative XPaths are generally preferred, because absolutes XPaths are prone to frequent changes in a webpage with dynamic content. A typical relative XPath has the structure //tagname[@attribute="value"] (for example //span[@class="price"]). To find XPath, right-click the element on the page and click “Inspect”. Then right-click on the element in the “Elements” Tab, and click “Copy XPath”.
XPath has some advantages over HTML/CSS selectors; for example, it can move both up and down along the tree, from parent to child node and back to the parent; it can also identify elements by matching visible texts on screen with a text() function. These capabilities make XPath a powerful selector and my preferred choice.
Amazon auto-login with selenium and XPath
In this 1st of the two-part mini-series on scraping Amazon.com website, I’ll describe how to write a python code to auto-login to your Amazon account. Logging in is not necessary do a price search for any item (which is the topic of the 2nd part of the series), but it helps to personalize search parameters based on interests and past search history.
When you log into Amazon from a new device or browser, these are the 4 steps you must follow:
- Load the “Sign in” page by clicking “Hello, sign in” box at the top-right menu of the homepage.
- Enter your user ID in the “Email or mobile phone number” window, then click “Continue” button.
- Enter password in the “Password” window, then click “Sign in” button.
- Enter the 6-digit OTP number in the “Enter OTP” window, then click “Sign in” button, and you are in.
The code implements each of these steps by means of a function or method defined inside a python class named AmazonAPI. In the main function main() at the bottom of the code, selenium launches a browser (Chrome in this example) controlled by the module webdriver and calls these methods sequentially in the same order. Steps #1-3 are automated and the browser should take you to the OTP window. The code will then ask you to type the 6-digit OTP number (from your cellphone or email) on the terminal and hit “Enter” key. The “Enter OTP” window will be auto-filled with this number, “Sign-in” button auto-clicked, and you will be logged in. (You can skip this final step by checking the “Don’t require OTP on this browser” box, and next time onward the code will directly log you in after step #3.)
So, let’s begin. First, all the required python modules are imported at the top of the code:
#!/usr/bin/env python3

import logging
import sys
from selenium import webdriver
from selenium.webdriver.common.by import By
from selenium.webdriver.support import expected_conditions as EC
from selenium.webdriver.support.wait import WebDriverWait

sys.path.append("../Libs")
from util import Util
These include, besides the selenium and other modules, a user-defined module Util that reads in my Amazon user ID and password. The logging module is used to log intermediate steps of the code, in lieu of the print() statement.
Next, the snippet below shows the initializer for class AmazonAPI and its first method loadSigninPage() that loads the “Sign in” page in step #1 above.
# main class to run Amazon auto sign-in script
class AmazonAPI:

    # initializer
    def __init__(self, browser, url, wait) -> None:
        self.browser = browser
        self.url = url
        self.wait = wait
        self.userId, self.password = Util.getLoginData("amazon")  # amazon login info

    # method to load 'Sign in' page
    def loadSigninPage(self) -> None:

        # load amazon.com
        self.browser.get(self.url)
        logging.info("Signing into Amazon...")

        # click 'Sign in' box at top-right
        signin_box = self.wait.until(
            EC.visibility_of_element_located(
                (By.XPATH, '//span[@id="nav-link-accountList-nav-line-1"]')
            )
        )
        signin_box.click()
Variables for the userID and password of the Amazon account are set in the initializer. The XPath element for the “Hello, sign in” box is returned by the selenium method visibility_of_element_located(). It is to be noted here that visibility_of_element_located() is slightly slower than presence_of_element_located(), because the former makes sure that the element is both present and visible (that is, it does not have 0 width and height).
Much of the content of modern websites is rendered by JavaScript, which means the scraping process is not instantaneous and instead may have to wait for the script to finish rendering. This is handled by the selenium module WebDriverWait, which sets a 5-second wait-time (assigned in the main() function below) for the process to complete, before a TimeoutException error is thrown. Setting a wait-time this way is better than using time.sleep(), which makes the program wait out the interval even if the process completes sooner.
Next follows the method enterUserID(), which enters the account user ID and clicks “Continue” button in step #2:
    # method to enter user ID
    def enterUserID(self) -> None:

        # send account userID to user ID window
        signin_elem = self.wait.until(
            EC.visibility_of_element_located((By.XPATH, '//input[@id="ap_email"]'))
        )
        signin_elem.send_keys(self.userId)

        # click Continue button
        continue_elem = self.wait.until(
            EC.visibility_of_element_located((By.XPATH, '//input[@id="continue"]'))
        )
        continue_elem.click()
Here two different XPath elements are extracted, first one for the user ID window and the second one for the “Continue” button below it. The userId string is transmitted to the window via the send_keys() method, and the “Continue” button is auto-clicked at the end to take us to the Password window in step #3.
This brings us to the enterPassword() method:
    # method to enter password
    def enterPassword(self) -> None:

        # send account password to password window
        password_elem = self.wait.until(
            EC.visibility_of_element_located((By.XPATH, '//input[@id="ap_password"]'))
        )
        password_elem.send_keys(self.password)

        # click 'Sign in' button
        signin_button = self.wait.until(
            EC.visibility_of_element_located((By.XPATH, '//input[@id="signInSubmit"]'))
        )
        signin_button.click()
This method is similar to enterUserId(): it scrapes the element for “Password” window, transmits the password string to this window, scrapes the element for the “Sign in” button, and clicks this button to load “Enter OTP” window.
We now reach the 4th and final step, implemented by the enterOTP() method:
    # method to enter OTP
    def enterOTP(self) -> None:

        # send OTP to OTP code box
        otp_box = self.wait.until(
            EC.visibility_of_element_located(
                (By.XPATH, '//input[@id="auth-mfa-otpcode"]')
            )
        )
        otp_string = input("Enter OTP from phone: ")
        otp_box.send_keys(otp_string)

        # click OTP button
        otp_button = self.wait.until(
            EC.visibility_of_element_located(
                (By.XPATH, '//input[@id="auth-signin-button"]')
            )
        )
        otp_button.click()
        logging.info("Signed in successfully.")
This method does little more than the previous two. The OTP number cannot be read in automatically, it has to be manually entered from the cellphone (or email). The code asks you to type in the number on your terminal, and transmits it to the OTP window before auto-clicking the “Sign in” button to let you in. This is a one-time requirement, you can opt to skip this step on the next log-in session. At that time just comment out the line calling this method in the main() function below, and the code with directly log you in.
This completes the definition of the class AmazonAPI. Final step is the main() function than puts all these together, initializing variables and calling these methods sequentially to get the job done.
# main function to put all these together
def main() -> None:

    # set logging config
    logging.basicConfig(
        level=logging.INFO,
        format="(%(levelname)s) %(asctime)s - %(message)s",
        datefmt="%Y-%m-%d %H:%M:%S"
    )

    # initialize browser variables
    url = "https://www.amazon.com"
    chromePath = "/usr/bin/google-chrome-stable"   # location of browser executable file
    options = webdriver.ChromeOptions()
    options.binary_location = chromePath
    browser = webdriver.Chrome(options=options)
    browser.set_page_load_timeout(5)  # wait-time for page loading to complete
    wait = WebDriverWait(browser, 5)  # wait-time for XPath element extraction

    # run codes
    amazon = AmazonAPI(browser, url, wait)  # create AmazonAPI() object
    amazon.loadSigninPage()
    amazon.enterUserID()
    amazon.enterPassword()
    amazon.enterOTP()  # comment this line if OTP is not needed

if __name__ == "__main__":
    main()
Logging level is set to INFO, which records all information about the code’s functioning except debug messages. The Chrome browser requires the binary path to be included in the webdriver‘s options argument, and other browsers may need it too. Lastly, two wait-times are set, one for loading the Amazon homepage, and the other for each time XPath element is scraped, as described before.
That’s it! Run this code, and you are in. Next up, how to automate Amazon price search with python.

Hi there! I am Roy, founder of Quantiux and author of everything you see here. I am a data scientist, with a deep interest in playing with data of all colors, shapes and sizes. I also enjoy coding anything that catches my fancy.
Leave a comment below if this article interests you, or contact me for any general comment/question.


